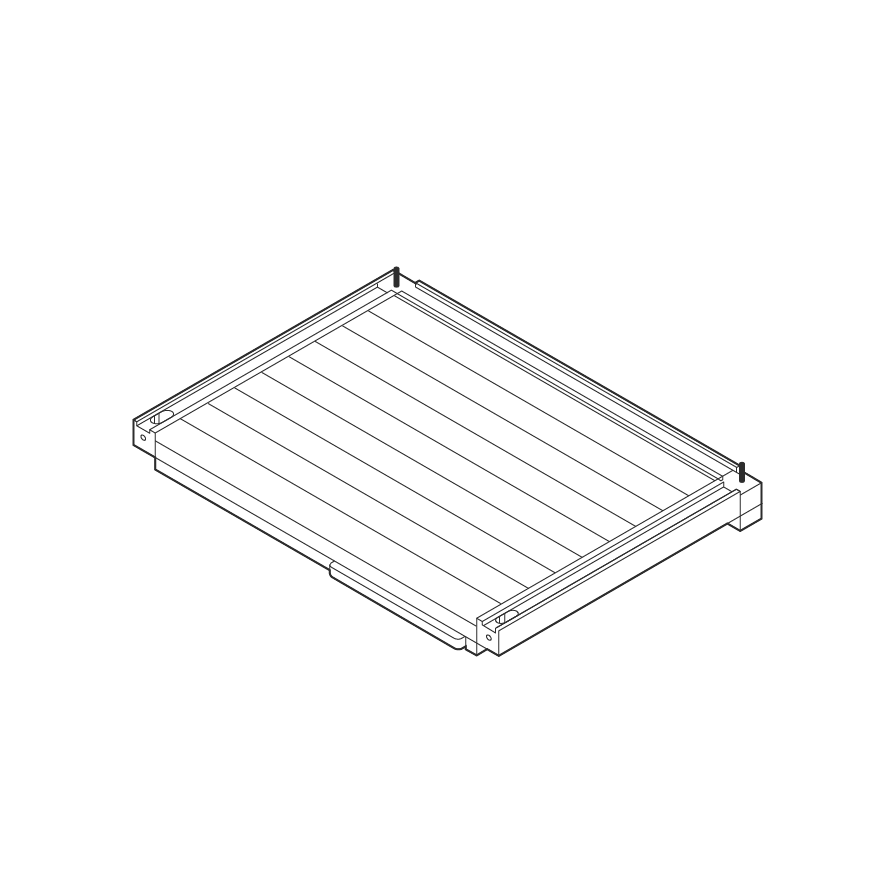
Step 1 - Position the Sauna Floor
- Prepare a flat, level, and stable (4’4” x 4’9”) surface to set up your sauna.
- Position the sauna floor (A) so that the “heater side” is on your right when you are facing the intended location.
- Use a level to check that the sauna floor is completely level side-to-side and front-to-back.
|
 |
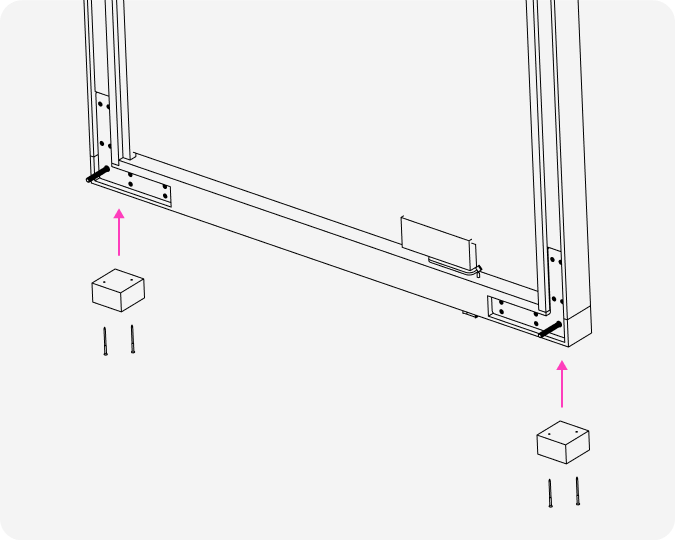
Step 2 - Prepare the Door
- Keep brackets on the door and carefully place the door on it’s side.
- Locate the door feet that come secured to the hardware box.
- Attach door feet (B) to the bottom edges of the door.
|
 |
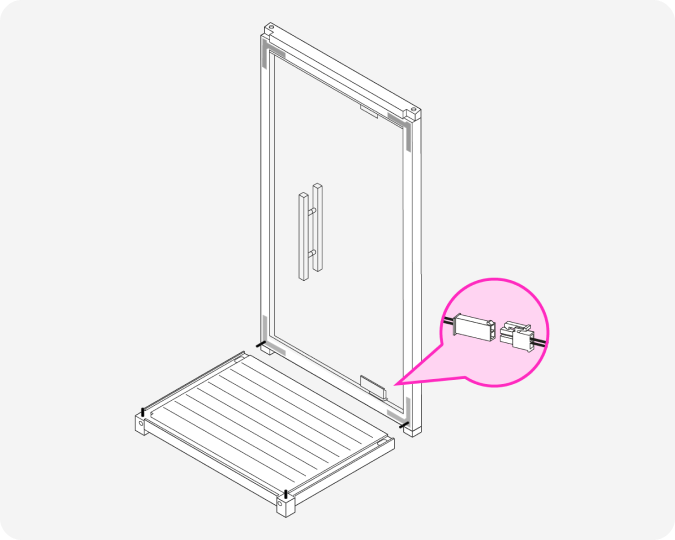
Step 3 - Align Door & Attach Sensor
- With two people, carefully lift the door (D) using the edges—never lift by the handle, as it will break.
- Align the door bolts with the pockets on the left and right side of the floor (A) but do not push them fully in yet.
- One person should hold the door steady while the other locates the door sensor wires at the bottom left of the door.
- Connect the door sensor wires securely.
- Confirm that the connection is secure before proceeding.
/!\ Please be careful not to set the door on cement or drop it.
|
 |
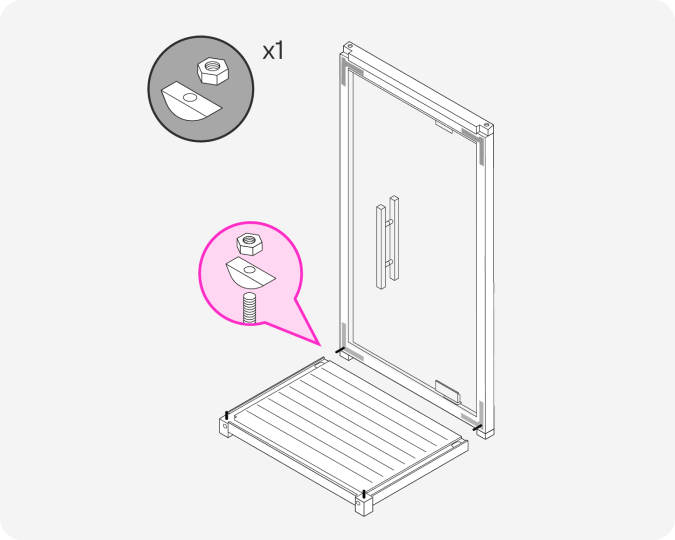
Step 4 - Attach Door to Floor
- Push the door bolts fully into the pockets on the floor.
- Secure the door using:
- (2) Half-moon washers
- (2) Nuts (provided with socket wrench)
- When securing the door bolts make sure the bottom door beam and sauna floor are completely flush.
- Tightening the bolts will not automatically pull the floor and bottom door beam flush—you must manually adjust the alignment.
|
 |
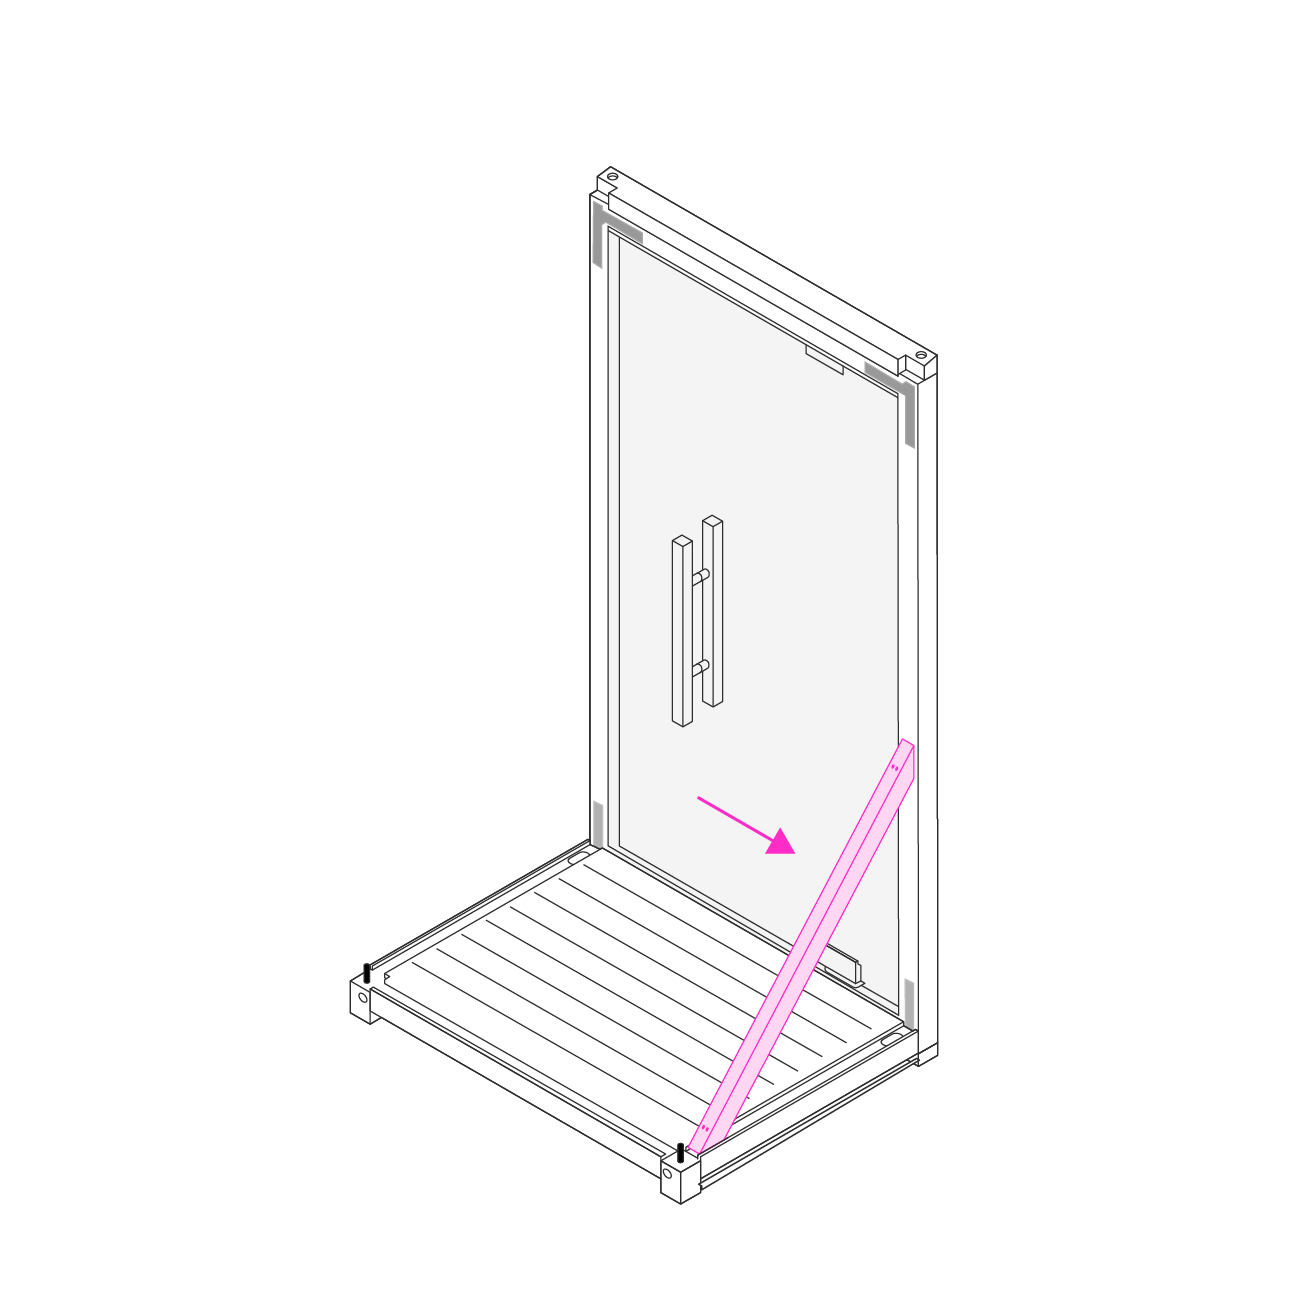
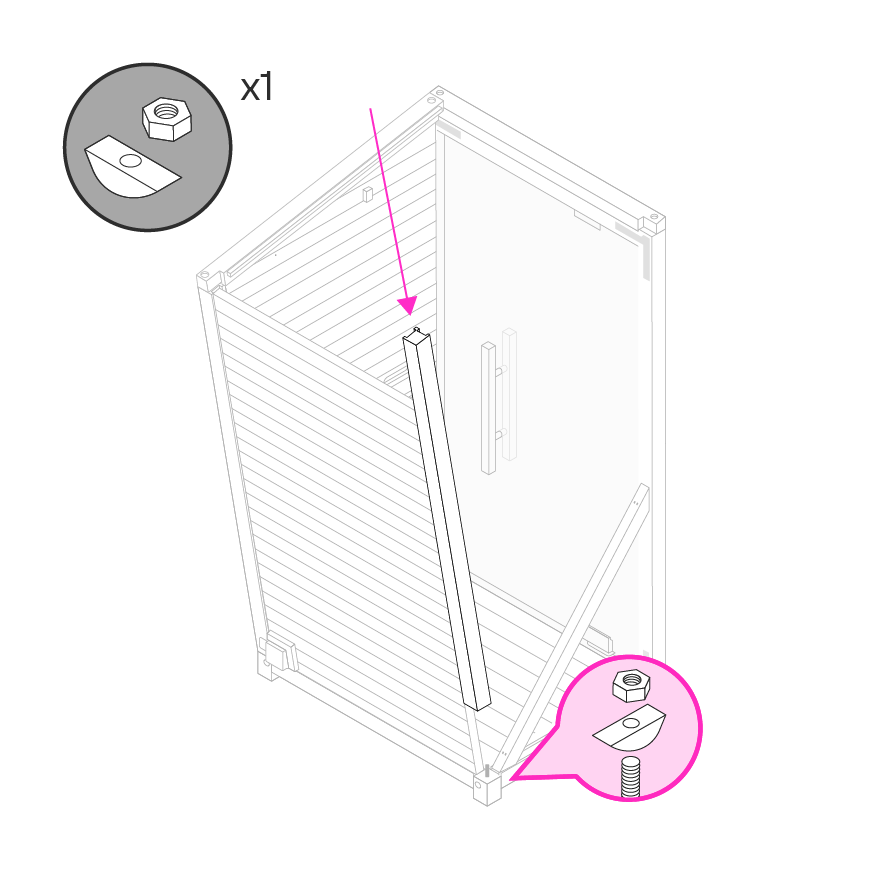
Step 5 - Brace Door
- While someone holds the door up, secure the door with the included 45 degree brace (S) with two screws on the left side to brace it straight up. The door is heavy and will need to be braced before the other walls go in.
- Now using the rocks, stack them on the back of the floor to use as a counterweight, so the door doesn’t fall forward.
-
DO NOT open the door until the sauna is fully assembled. (!) Risk of tipping.
- You can now unscrew and remove the brackets on the side of the door.
|
 |
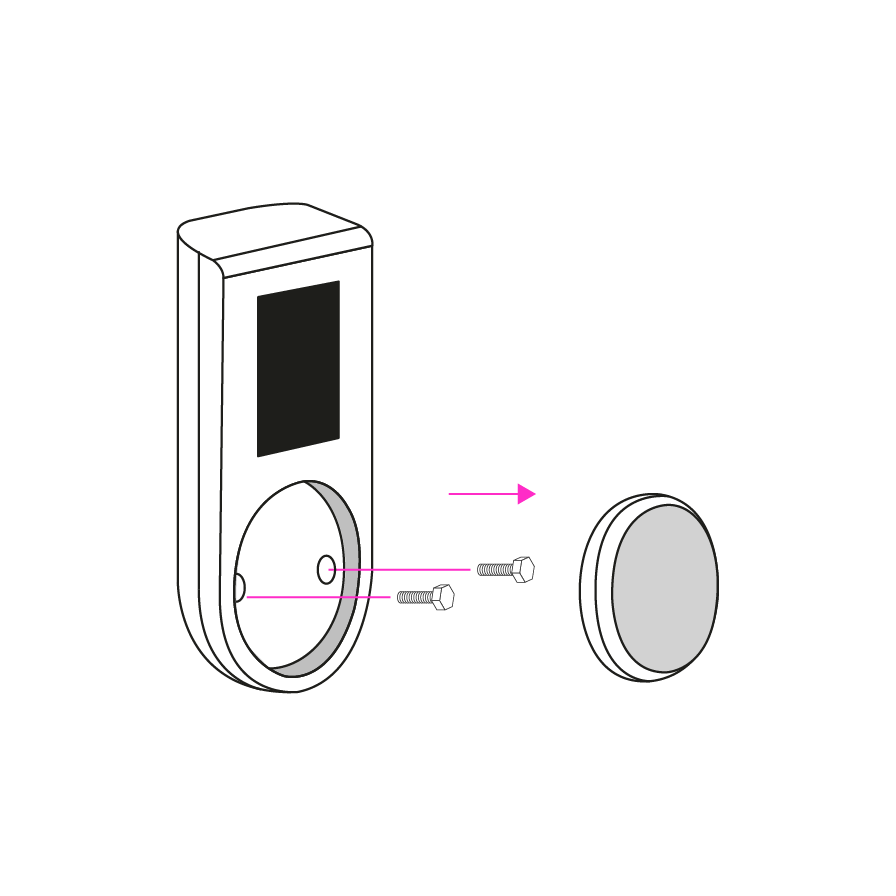
Step 6 - Remove UKU Controller
- The Huum Uku Controller (H) is located on the right outside of the door.
- Remove the black dial on the controller to see the two screws securing it.
- Unscrew both screws and remove the Huum Uku Controller (H).
- Please set both pieces to the side for later use.
|
 |
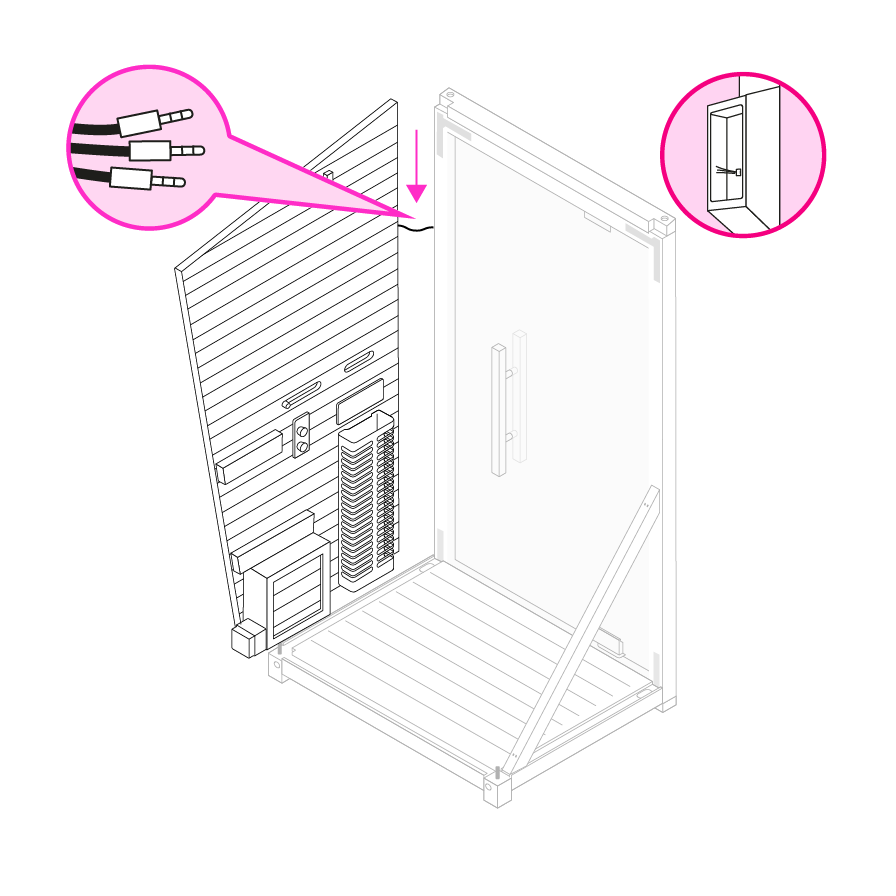
Step 7 - Install UKU Controller Wires & Heater Panel
- Before lifting the heater panel, check that the heater feet are screwed all the way up.
- If the heater feet are extended, they create gaps in the assembly.
- Place the heater panel (E) into the groove in the floor (A).
- Slide the heater panel close to the front post to feed the bundle of wires through the hole where the Huum Uku Controller (H) will later be installed.
- Slide the heater panel forward into the groove of the front post.
-
Tip 🚨: If the panel doesn't slide in easily, lightly tap it with a rubber mallet while the second person supports and wiggles it into place.
- Ensure the panel is fully seated and flush in both the bottom beam and front post beam
-
|
 |
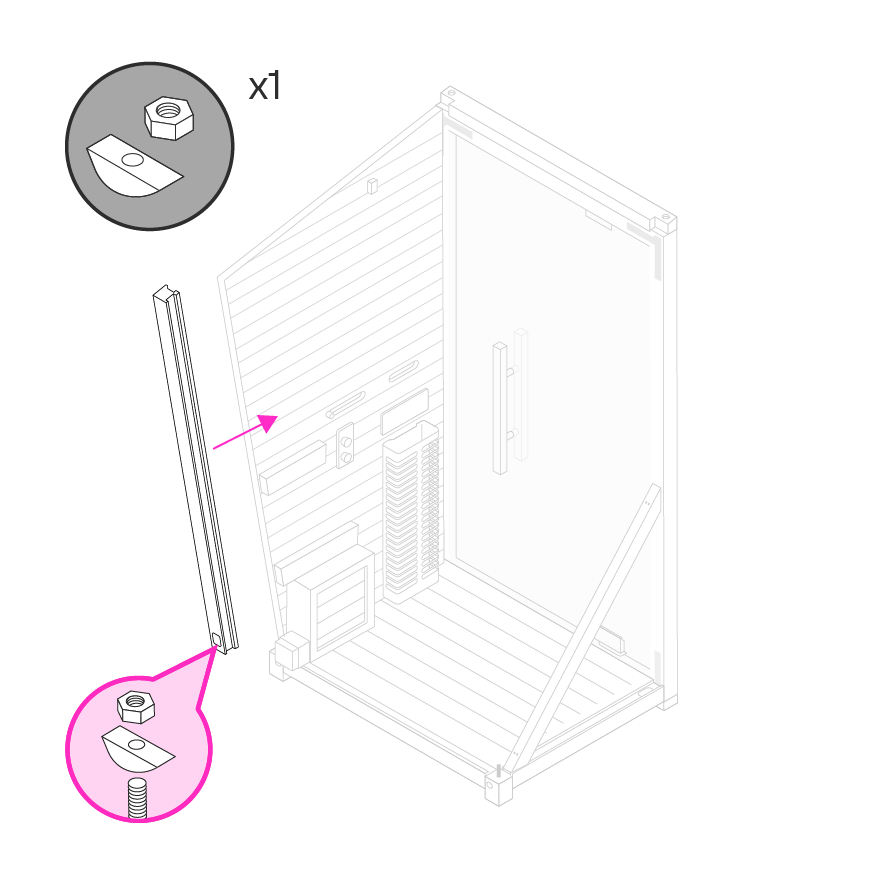
Step 8 - Secure Back Right Post
- Position the right back post (G) against the heater panel and bottom beam.
-
Push the bottom of the back post forward and inward to ensure the two bottom joints are flush with the bottom beams.
- One person should apply pressure to the bottom of the post while the second person secures the post in place.
- Secure the post using:
- (1) Half-moon washer
- (1) Nut (provided with socket wrench)
- Double-check that the back post remains flush with the bottom beam before fully tightening.
|
|
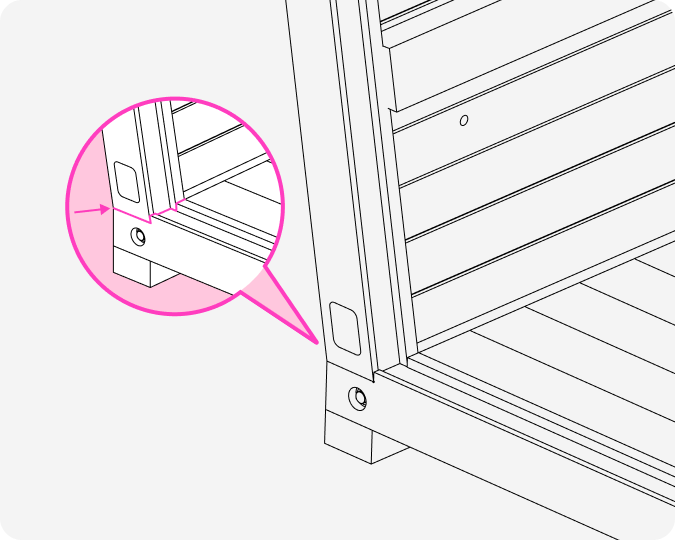
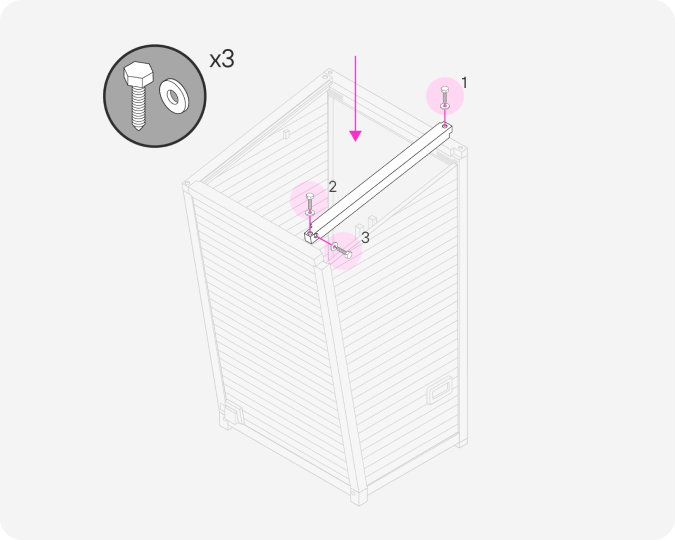
Step 9 - Secure Top Right Beam
- Grab the top heater panel beam (F).
-
Start with the front door post: Secure the lag bolt to the front door post first using the provided screw and flat washer (with socket wrench).
-
Next, move to the back post: Once the front lag bolt is securely fastened, proceed to the back post.
-
⚠️To secure the lag bolt to the back post, one person must push the back post forward towards the front post.
-
Ensure that the holes align so that the panels fit securely into the grooves of the posts.
⚠️ Important: Make sure the pre-drilled holes in both the back post and top beam are aligned to maintain proper panel alignment during assembly.
|
 |
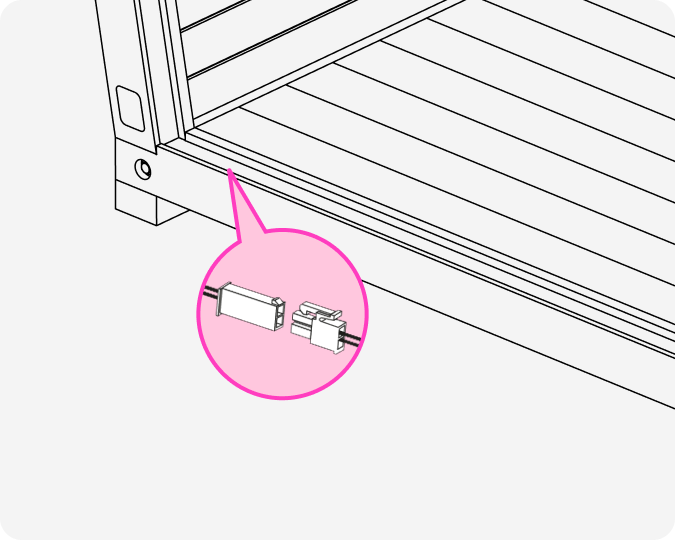
Step 10 - Connect Door Sensor Wires
-
Before installing the back panel, remove the door sensor wire taped to the groove of the back floor beam.
- Disconnect the wire from the bottom back beam and connect it to the wire coming out of the back of the electrical box.
Tape the two connected wires securely to the back of the electrical box to prevent damage during the rest of the assembly.
|
 |
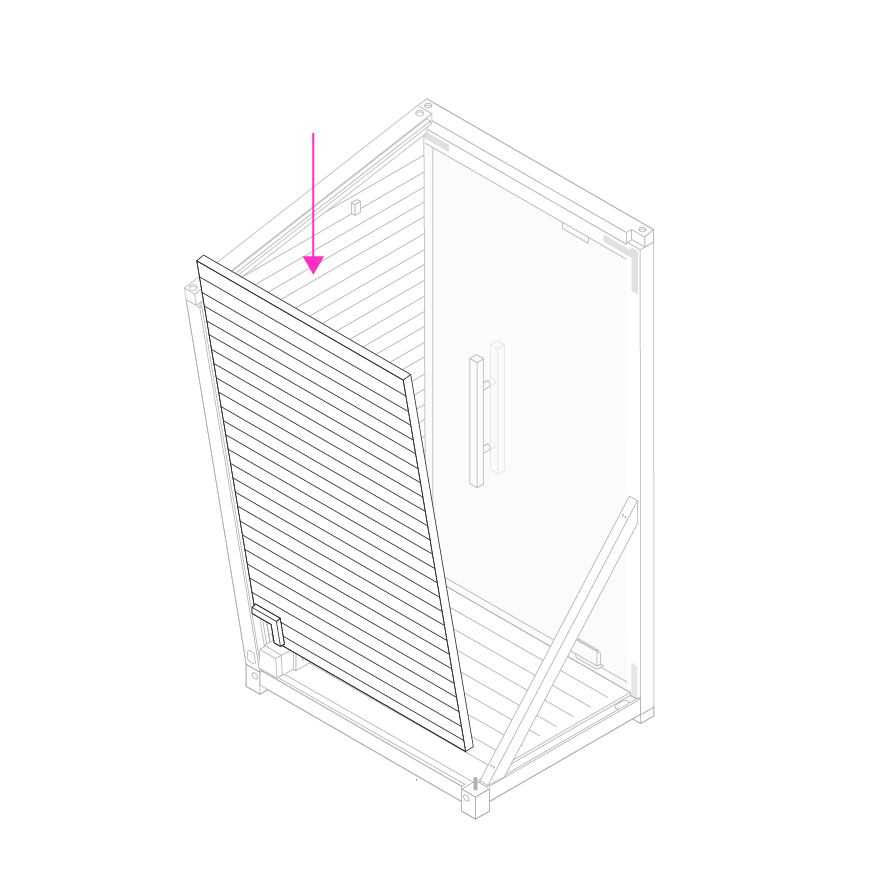
Step 11 - Install Back Panel
-
Carefully slide the back panel (I) into place.
-
Ensure the back panel is fully seated in the groove of:
-
The floor (A)
-
The back right post (G)
⚠️ Important: One person must hold the back panel in place while the other secures the left back post (G).
|
 |
Step 12 - Secure Back Left Post
- Grab the back left post (K) and slide it over the bolt sticking out of the bottom beam.
-
Push the bottom of the back left post forward and inward to ensure the joints are flush with the rear panel and bottom beams while the second person secures it.
- Secure the post using:
- (1) Half-moon washer
- (1) Nut (provided with socket wrench)
- Double-check that the post remains flush with the rear panel and bottom beam before fully tightening.
|
|
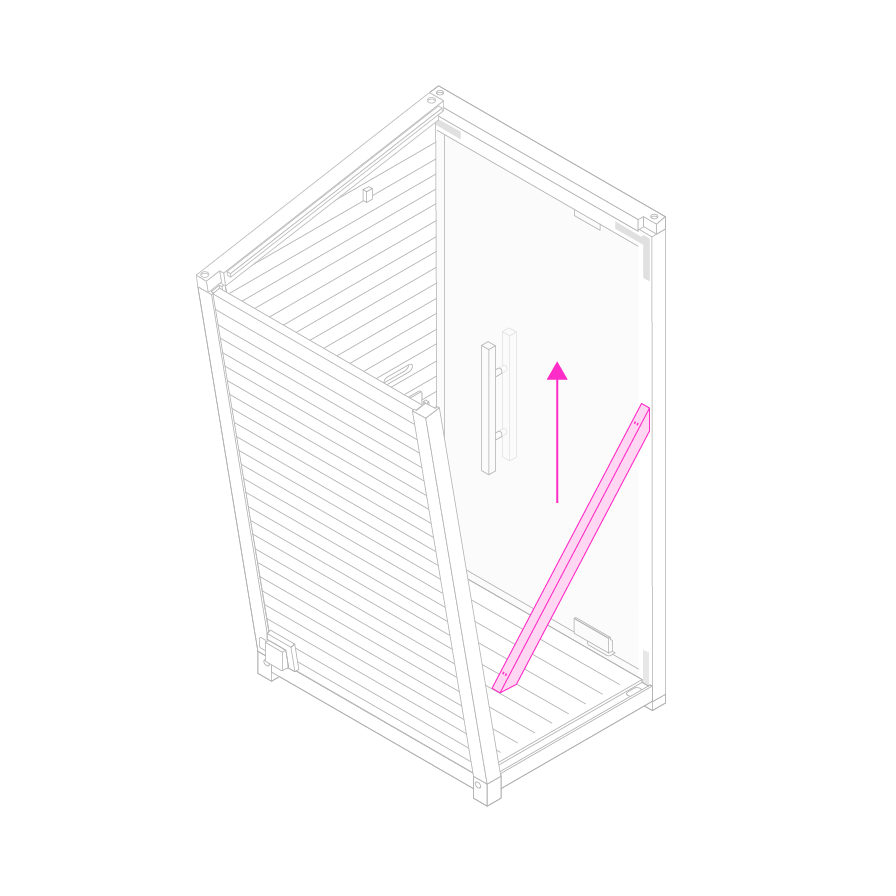
Step 13 - Remove Door Brace
- Use the drill to remove the 45 degree brace (S).
|
 |
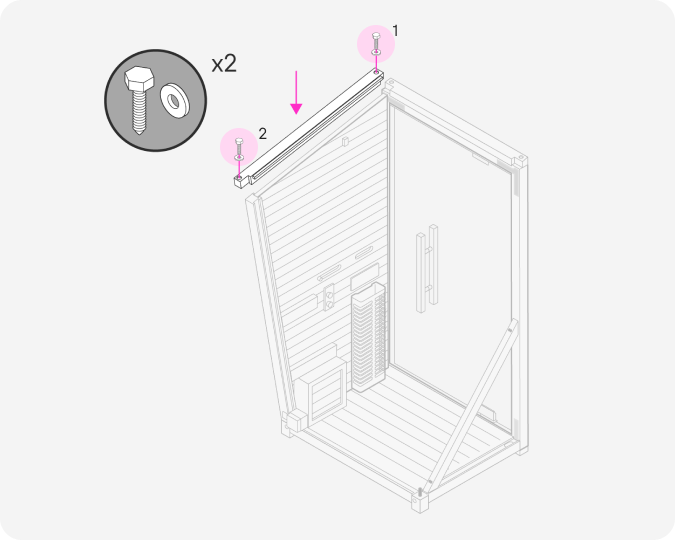
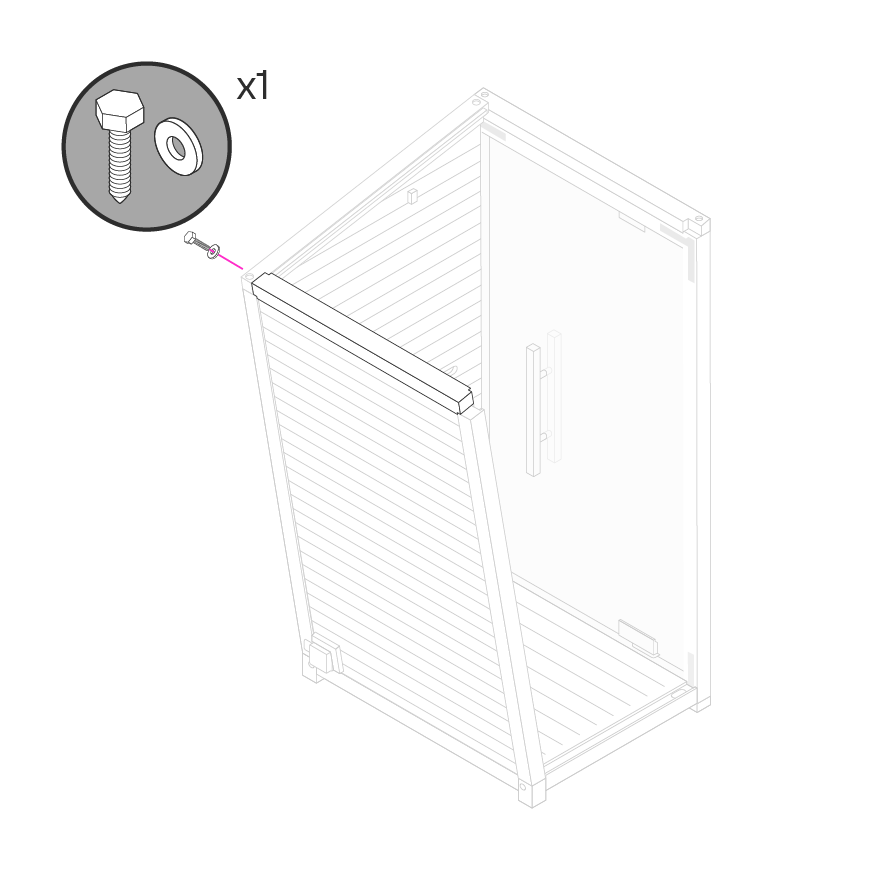
Step 14 - Install Top Back Beam
- Grab the back top beam (J) and place it on top of the back panel.
-
Start by securing the back right post (heater side) first. Ensure the hole on the back right post and the back beam line up when securing the lag bolt.
-
Next, secure the back left post. One person should apply pressure to the bottom of the back left post forward toward the front post to ensure the drilled holes align when securing the lag bolt.
- Once the holes are lined up, secure the posts using:
- (1) Lag bolt and flat washer (with socket wrench)
⚠️ Important: Misaligned holes can cause gaps in the assembly and strip the pre-drilled holes
|
 |
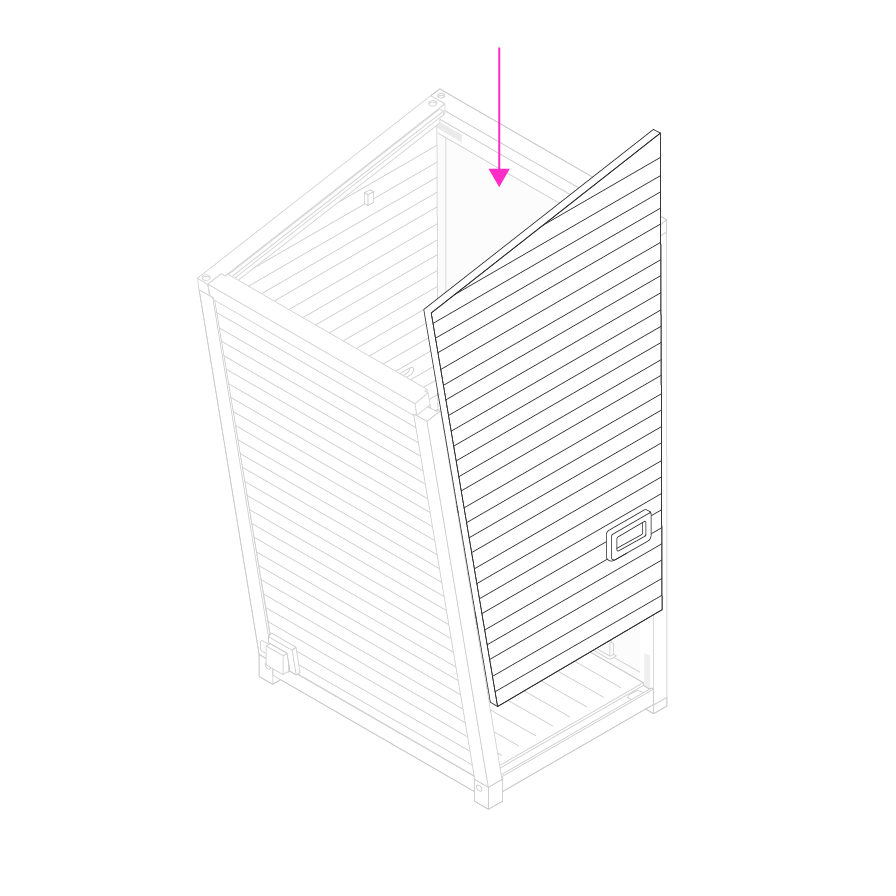
Step 15 - Install Left Panel
-
Lift the left panel (L) and carefully lower it into the grooves of the back left post, the bottom beam, and the front left post.
- The panel must be slid down uniformly to ensure it fits fully into place. If not, it may not slide completely into the grooves.
⚠️ Important: This step requires two people to lift and guide the panel into place.
|
 |
Step 16 - Secure Top Left Beam
-
Place the top left beam (M) on top of the left panel (L).
-
Secure front left post first: Secure the top left beam to the front left post using (3) screws and flat washers (with a socket wrench).
-
Next, secure back left post: Once the front screws are securely fastened, proceed to the back left post.
⚠️ To secure the top left beam to the back left post, one person must apply pressure to the back left post, pushing it forward towards the front left post to ensure the holes align properly.
|
 |
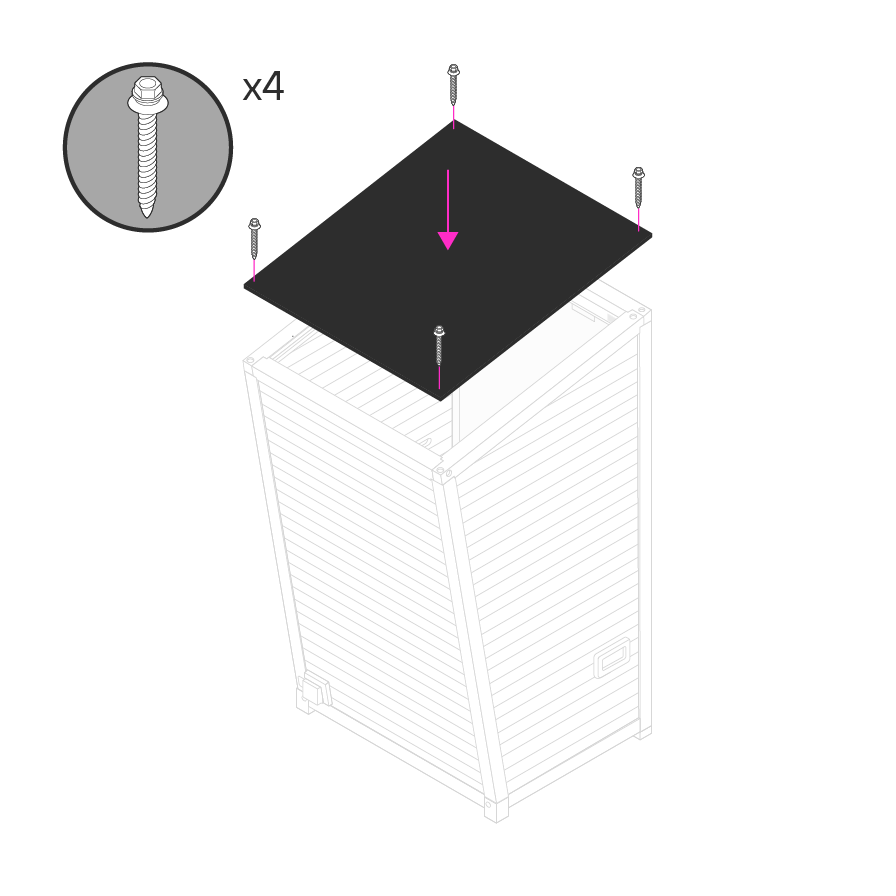
Step 17 - Install Room
- Grab the roof (N) and slide it onto the top of the sauna from front to back.
- The roof has a panel on the bottom that should fit snugly into the top of the sauna to seal it.
-
Secure the roof using roof fasteners (JJ):
-
One screw in each corner (front left, front right, back left, back right).
|
 |
Step 18 - Connect Light/Fan Wires & Install Benches
- Connect the three wires where the benches will be placed.
- Two connection points are where the back panel and right panel come together
- One connection is where the back panel and left panel come together.
- Grab the foot rest (O), holding it vertical, bring it into the sauna.
- Place the foot rest on the bottom slot and secure it with the bracket below.
- Bring in the top bench (P) and secure it above the foot rest (O) with the brackets.
|
 |
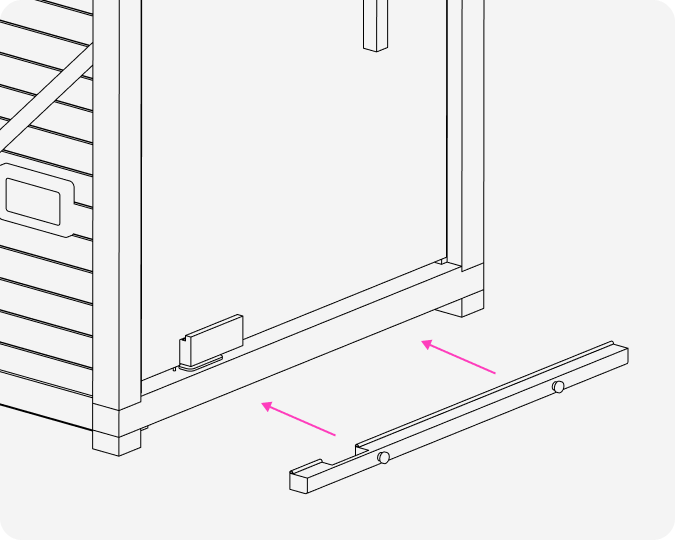
Step 19 - Install Drip Tray Cover
-
Position the Drip Tray Cover (T) underneath the bottom door beam.
- Ensure door sensor wires tuck into cut out section of drip tray blocker.
-
Slide the drip tray cover into place. It will fit snugly and will magnetically connect when fully slid in.
|
 |
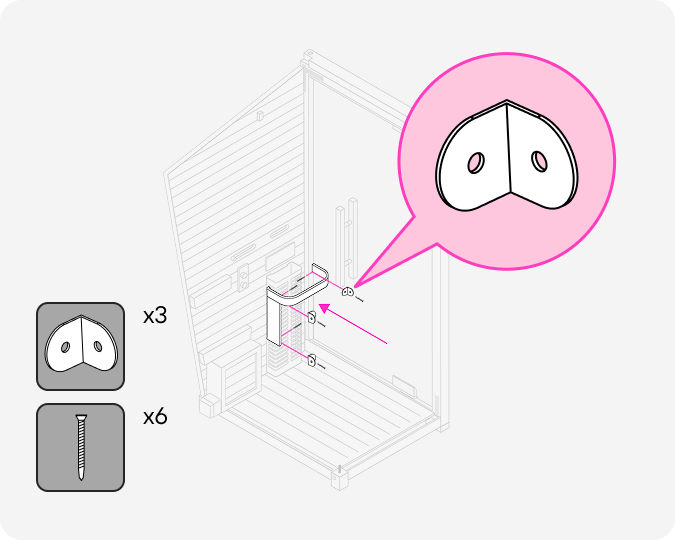
Step 20 - Install Knee Guard
-
Grab the knee guard and locate the three black brackets and six small black screws from the hardware kit.
-
Install two brackets on the inside of the long side:
-
Install one bracket on the inside of the short side.
-
Position the long side of the knee guard to the left of the heater and the small side to the right of the heater.
-
Secure the brackets with screws to the heater panel using the small black screws.
-
The top of the knee guard should be about the same height as the top of the heater.
⚠️ DO NOT install any other accessories to heater panel. Doing so can damage wiring in heater panel resulting in product failure which is not covered under warranty.
|
 |
Step 21 - Inspect Door Sensor Probe & Magnet
-
Go inside the sauna and locate the probe, which is protruding through the bottom beam to the right of the bottom door hinge/clamp.
- The probe should be no more than 1/2" from the magnet. The magnet is glued to the glass, directly above the probe.
-
Ensure the gap is no more than 1/2" between the probe and the magnet. If the gap is larger, the door sensor will not be deactivated, and the heater will not turn on.
If probe has been pressed down into the hole it will need to be raised up 1/2" for the heater to activate.
|
 |
Step 22 - Final Checks
- Lower the feet on the heater to ensure it is fully positioned and stable.
- Check to make sure the sauna is level both side-to-side and front-to-back
|
|

Comments
0 comments
Please sign in to leave a comment.